Here you find instructions on how to create, rename, move, merge, deprecate, delete, reuse, pin and sort terms in SharePoint’s term store.
How to create a term
- Open the term store.
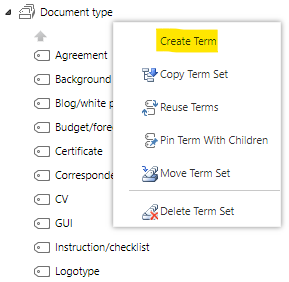
- Hover with the mouse over the term set where you want to create the term, till it shows an arrow on its right hand side. Click thereafter on the arrow and then select the “Create Term” function:
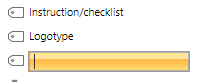
If terms are to be children of a specific term (created in a hierarchical structure), do the same procedure but now hover over a term’s name, till it shows an arrow on its right hand side. - Type a meaningful name for the term and press the enter key on your keyboard:
- If a term is not to be used as a document’s tag (only used to group similar terms), then unmark the check box “Available for tagging” and click on the “Save” button:

Terms that are not available for tagging are shown as greyed out, in the icon and their labels:
In the above example, you can tag documents on “Q1”, “Q2”, “Q3” and “Q4” but not on “Quarter”. This term is just used to group its underlying terms. - If you want a description to be shown when hovering over a term, give the term a “Description”:

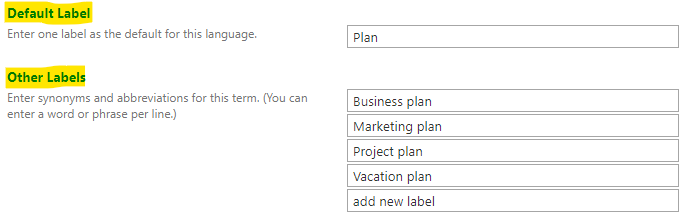
- If the term has more than one logical name, add “Other labels” to it, like in this example:
This will make it possible to search on both the default label and any other labels, both in the document property form and in the search box, so that you get a result, even if you search for an alternative label, as in this example:
- Newly created terms will directly be available in MetaShare. If MetaShare however already is open in a browser session you will first need to refresh the page before you will see the newly created term.
How to rename a term
- Open the term store.
- Open the term set where the term that you want to rename is located.
- Click on the term that you want to rename.
- On the term’s page, change the term’s “Default label” and click on the “Save” button:

- Renamed terms will directly be reflected in MetaShare’s document filters and the documents’ property forms (when uploading or creating documents and when editing a document’s properties). If MetaShare already is open in a browser session you will however first need to refresh the page before you will see the renamed term.
- Documents that were tagged with a term that has been renamed will initially show the term’s old name, but within a couple of hours the document’s tag should be renamed (if they are not renamed within 24 hours, you might have to open a support case with Microsoft). If the term also is used as workspace metadata these will not be reflected directly in MetaShare’s start page. You will first have to edit one of the workspaces that has the renamed term. After this update, all of the other workspaces that were tagged with the renamed term will now get the correct term.
How to translate a term
- Open the term store.
- Open the term set where the term that you want to translate is located.
- Click on the term that you want to translate.
- On the term’s page, change the term’s “Language” to the language you want to translate to:
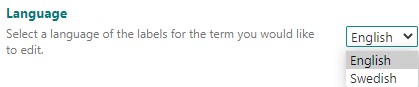
Note that this is only possible if the term store is configured to have multiple languages. - On the term’s page, you can now translate the term’s “Default Label”, its “Description” and if needed also add “Other Labels”. When you are done, click on the “Save” button:

- Translated terms will directly be reflected in MetaShare’s document filters, the documents’ property forms (when uploading or creating documents and when editing a document’s properties) and as metadata values in the document view. If MetaShare already is open in a browser session you will however first need to refresh the page before you will see the translated terms. You might also need to change MetaShare’s display language to the selected language.
How to move a term
The main reason to move terms is to have them logically grouped in a hierarchical manner within the same term set.
- Open the term store.
- Open the term set where the term that you want to move is located.
- Hover with the mouse over the term that you want to move, till it shows an arrow on its right hand side. Click thereafter on the arrow and then select the “Move Term” function:

- Select a destination for the term (its future parent) and then click on the “OK” button.
- Moved terms will directly be reflected in MetaShare’s document filters. If MetaShare already is open in a browser session you will however first need to refresh the page before you will see the renamed term.
How to merge terms
The main reason to merge 2 terms is if the terms mean the same thing. After merging term X to term Y, documents that were tagged with term X will after the merge be tagged with term Y.
- Open the term store.
- Open the term set where the terms that you want to merge are located.
- Hover with the mouse over the term that you want to merge with another term, till it shows an arrow on its right hand side. Click thereafter on the arrow and then select the “Merge Terms” function:

Note that the term that you merge with needs to be on the same hierarchical level, so if the term that you want to merge with is child to another term, you first need to move the source term to the same parent. - Select the term that the term is to be merged with and then click on the “OK” button.
- The label of the term that you merged will be added as “Other labels”. If you do not want to keep this, you can safely remove the “Other label”.
- Merged terms will directly be reflected in MetaShare’s document filters and the documents’ property forms (when uploading or creating documents and when editing a document’s properties). If MetaShare already is open in a browser session you will however first need to refresh the page before you will see the renamed term.
- Documents that previously were tagged with the term that was merged into another term will within a couple of hours automatically be tagged with the term that it was merged into (if they are not merged within 24 hours, you might have to open a support case with Microsoft).
How to deprecate a term
The main reason to deprecate a term is if you don’t want new documents to be tagged with a specific term but still allow old documents to be tagged with the term, even if you edit them or edit their documents’ properties. It could, e.g. apply to a product that no longer is sold or managed. So if there are documents that are tagged with the term, deprecate it instead of deleting it.
- Open the term store.
- Open the term set where the terms that you want to deprecate are located.
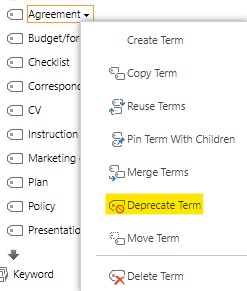
- Hover with the mouse over the term that you want to deprecate, till it shows an arrow on its right hand side. Click thereafter on the arrow and then select the “Deprecate Term” function:
How to delete a term
The only time you really should delete a terms is if the term has never been used and you don’t need it anymore. Else you should either merge it to another term or deprecate it.
- Open the term store.
- Open the term set where the terms that you want to merge are located.
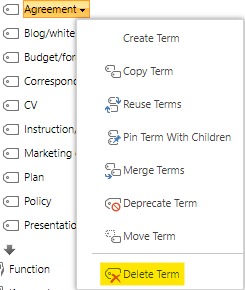
- Hover with the mouse over the term that you want to delete, till it shows an arrow on its right hand side. Click thereafter on the arrow and then select the “Delete Term” function:
Note
- The term store does not have any recycle bin, so if you delete a term that’s being used, then all documents that are using this term will have a link to a term that no longer exists.
- If you delete a term that has been reused or pinned and therefore has any of these symbols:


you should first check if the term is the “Source term”, in the term’s “Member of” section. If it is then change the “Source term” to the term that will be left in the term store and click on the “Save” button: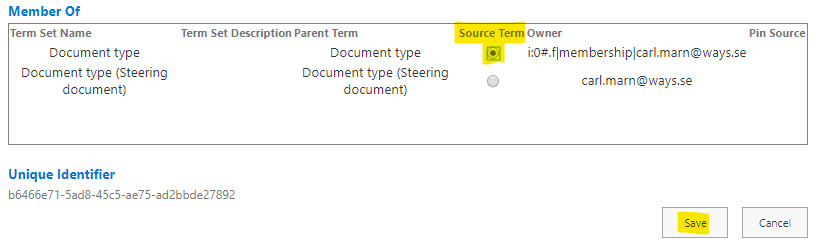
After this you can safely delete the term.
If you however accidentally delete the source term, you will later be able to find the deleted term under a term set under the “System” term set group and can do the change from there:
After making the change, the orphaned term will be deleted.
How to reuse or pin terms
Terms can be reused/pinned in other locations in the term hierarchy. Changes to reused terms are synchronized in both directions, if you are a contributor in the source term set. The pinned terms are similar to reused terms, with these exceptions:
- Pinned terms can only be modified from the source location (the pinned terms in the destination location are read-only). Reused terms can be modified from both locations (source and destination location).
- If you reuse or pin a term that has child-terms, both the parent and child terms will be made available in the destination location. If you add a child-term in the source location it will automatically be added to the destination location but only if you select the “Pin Term With Children” option.
This is how you reuse or pin terms:
- Open the term store.
- Hover with the mouse over the term set where you want to reuse/pin a term from another term set, till it shows an arrow on its right hand side. Click thereafter on the arrow and then select the “Reuse Terms” or the “Pin Term with Children” functions:

- Select the term that you want to copy and then click on the “OK” button.
- If you selected the reuse function, the term will get this symbol:
- If you selected the pin function, the term will get this symbol:
- If you selected the reuse function, the term will get this symbol:
How to sort terms in a custom order
By default terms are presented in alphabetical order but if you want them to be presented in another order you can do this by selecting the “Custom Sort” tab. Here you first need to change the sort order from “Use default sort order according to current language” to “Use custom sort order” and then you have to add the sort order for all the terms in the term set:
If you later want to revert to standard sort order just change the radio button option back to “Use default sort order according to current language”.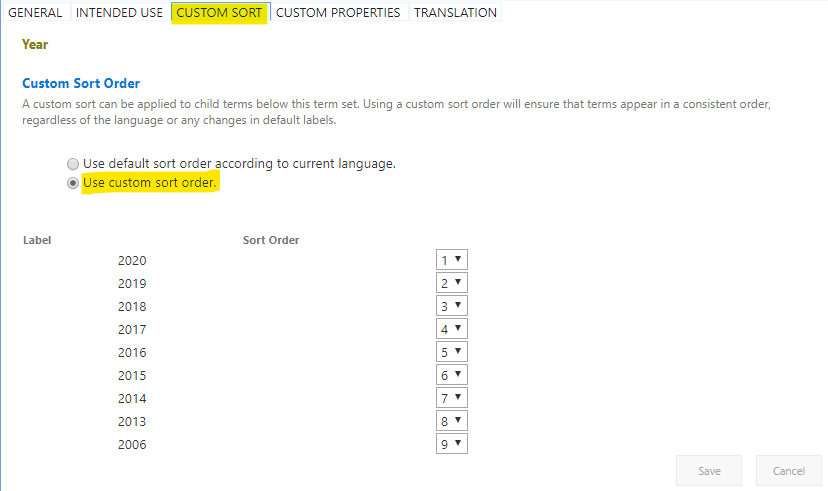
Discover MetaShare
Metadata-centric document management system in Microsoft 365/SharePoint
- Eliminates annoying gaps in standard SharePoint
- Ensures data in SharePoint is well structured
- Structures with metadata instead of storing in traditional folders
- Centralized and simplified administration
- Orchestration/provisioning of settings
- Refined Enterprise search