Here you find instructions on how to create a term set import file.
- Open the Term Store.
- Under the section “Sample Import”, on the right side of the screen, click on the link “View a sample import file”:

- After opening the file this is how it will look like:

- Mark the whole data set, e.g. by typing CTRL-A, select the “Data tab” in the ribbon and then select the “Text to Columns” command:

- Change the “Original data type” to “Delimited” and then click on the “Next” button:

- Change the “Delimiters” option to Comma and then click the “Finish” button:

- The Excel file will now be easier to read and work with as it will have column headers and column data. This file could then be edited by any business-user with minimum instructions:

- Now you can replace the sample text with real data (the columns that are bold are mandatory):
- Term Set Name – The name of the term set (note that if a term set with the same name already exists in the term group where you import the term set import file, the term set will be imported into a term set with 1 as a suffix, so there is no risk of overwriting any term sets in the term store using the out of the box term set import function).
- Term Set Description – A description of the term set. It can be left blank.
- LCID – The language that the term set will be imported as. It can be left blanc.
- Available for Tagging – TRUE if users are to be able to select the term and tag it to an item in a list/library, else FALSE.
- Term Description – If the term itself should have a description, apart from the term’s name itself. In MetaShare, term descriptions are shown when hovering over a term in the solution.
- Level 1 Term – A top-level term in the term set.
- Level 2 Term – If the term set is hierarchical, this is the name of the level 2 term. Note that the parent of the “Level 2 Term” needs to be specified in the row’s “Level 1 Term” column.
- Level 3 Term, etc. – same description as for Level 2 Term.
- The term import file needs to have at least one row, apart from the column header row and each term is added as a new line.
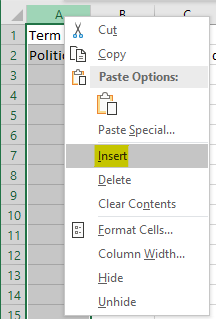
- Now right click on column “A” and select the “Insert” option:
- Paste the following formula into Cell A1 (first enter the cell by pressing the F2 key and then paste in the formula):
=IF(B1="";",";""""&B1&""""&",")&IF(C1="";",";""""&C1&""""&",")&IF(D1="";",";""""&D1&""""&",")&IF(E1="";",";""""&E1&""""&",")&IF(F1="";",";""""&F1&""""&",")&IF(G1="";",";""""&G1&""""&",")&IF(H1="";",";""""&H1&""""&",")&IF(I1="";",";""""&I1&""""&",")&IF(J1="";",";""""&J1&""""&",")&IF(K1="";",";""""&K1&""""&",")&IF(L1="";",";""""&L1&""""&",")&IF(M1="";",";""""&M1&"""")
Note that Excel-formulas are language specific so if you, e.g. are using a Swedish Excel, IF becomes OM… - Copy the value of Cell “A1” to all cells in Column 1 (just for the rows that represent a term).
- Right click on column “A” and select the “Copy” option:

- Open “Notepad” and paste in the copied cells. This is how the file should look like now (note that all terms are enclosed in quotes and that commas are used as column separators):

- Save the file by choosing the “Save As…” option:

- Change “Save as type:” to “All files (*.*)”, choose a meaningful file name with “.csv” as extension, change Encoding to “UTF-8” and then click on the “Save” button:

Discover MetaShare
Metadata-centric document management system in Microsoft 365/SharePoint
- Eliminates annoying gaps in standard SharePoint
- Ensures data in SharePoint is well structured
- Structures with metadata instead of storing in traditional folders
- Centralized and simplified administration
- Orchestration/provisioning of settings
- Refined Enterprise search