To be able to create documents from within MetaShare’s user interface, a document library for MetaShare’s document templates needs to be created, configured and defined.
Below you find instructions for how to:
- Create the document templates’ library and set appropriate permissions
- Add document columns to the templates’ library
- Define the path to the document templates, in MetaShare
- Make the MetaShare templates available from Office applications
Create the document templates’ library and set appropriate permission
In order to make the templates easily accessible to the template editors, our recommendation is to create a MetaShare workspace for your document templates, based on a unique workspace configuration that makes it easy to find and structure the templates.
The document template’s can however be stored in any SharePoint site, e.g. a specific document library in the content type hub, or a specific standard SharePoint site collection. Regardless of where the templates are stored, all users need read permissions to the library where they are stored.
Add document columns to the templates’ library
In order to create smart document templates, the document library needs to have the columns that should be added to the templates. If the templates are located in a MetaShare workspace this step might not be needed, as MetaShare automatically adds document columns to the document library, but only the document columns that belong to the workspace configuration’s content type(s). To add document columns to the templates’ library, do the following:
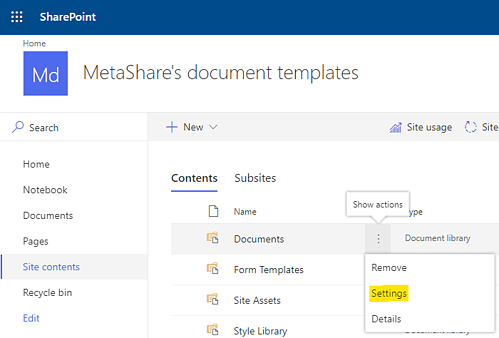
- Open the document library’s settings by clicking on “Site contents” on the left navigation, then clicking on the ellipsis (three vertical dots) and selecting the “Settings” option:
- Under the “Columns” section, click on the “Add from existing columns” link:

- To make it easier to select the applicable columns to add, select the applicable site column group. Select the applicable columns, click on the “Add” button and then on the form’s “OK” button.

Define the path to the document templates, in MetaShare
- Once the document template library has been created, copy the path to the document library and paste it into the “Document template library” field in MetaShare’s general settings:

- Add meaningful templates to the document template library.
- A “New” function will now be visible in the toolbar inside workspaces, displaying all templates in the document template library. Click it to create documents.
Get started with PnP Powershell
This page contains code snippets for PnP PowerShell, a module from the Patterns and Practices community with many useful commands for managing Microsoft 365.
To get started you need to:
- Install PowerShell 7 on your machine
- Install the PnP.PowerShell module
- Register an app in Entra ID that PnP.PowerShell can use for authentication
- Start PowerShell 7 from the start menu (or run pwsh.exe). PnP.PowerShell is imported automatically.
- Connect to your SharePoint site using:
Connect-PnPOnline `
-Interactive `
-Url "https://[tenant].sharepoint.com/" `
-ClientId "[Your PnP PowerShell App Id, found in Azure Portal]" - Run any of the available commands
Make the MetaShare templates available from Office applications
The document templates that are uploaded to MetaShare’s template library can also be made available from Office applications (Word, Excel and PowerPoint), if users also want to create documents from there, but only the “real” document templates will be shown (.dotx, .potx, .xltx). This is done by designating the template’s library as the central location for organization assets across your tenant, using PowerShell, by following these steps:
- Open PowerShell (click on the computer’s start button and type “PowerShell”) and start the application.
- Connect to SharePoint with this PnP PowerShell command (replace “[tenant]” with your tenant):
Connect-PnPOnline `
-Interactive `
-Url "https://[tenant].sharepoint.com/" `
-ClientId "[Your PnP PowerShell App Id, found in Azure Portal]" - Make sure that “Everyone except external users” group has Read permissions on the library where your templates are located. Customize permissions on files and folder in the library if needed.
- Make sure that CDN is enabled for your organization by running the following command:
Set-PnPTenantCdnEnabled -CdnType Private -Enable $true - Designate the template’s library as an organization assets library, by running this PowerShell command, with this syntax:
Add-PnPOrgAssetsLibrary `
-LibraryURL [the URL for the template's library] `
-OrgAssetType OfficeTemplateLibrary `
-CdnType Private - Wait a couple of hours to a day for this change to be reflected in your Office applications.
- Once the changes have been applied, your MetaShare templates will now be shown in Office, when you click on the application’s “File” tab, the “New” option on the left navigation and then a tab with your organization’s name on it:
