In MetaShare permissions are set on a workspace level. The following instructions define how an owner of a specific workspace can set permissions in a workspace and how users that have been granted member’s or visitor’s access to a workspace can view which users have be assigned access to a workspace.
- Navigate to the workspace that you want to set/view permissions.
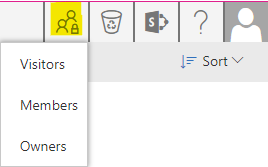
- Click on the workspace’s Groups icon, available in the workspace’s top bar:

- Decide which group you want to modify/view by clicking one one of the three options in the drop down list. When hovering over any of the groups a short description of the permissions is shown, as a tool-tip but in short these are the permissions that are granted when assigned to one of the groups:
- Visitors: Users assigned to this group will only be able to view documents (will not be able to create, upload, edit, publish/unpublish, submit for approval or delete)
- Members: Users assigned to this group will be able to edit documents (create, upload, edit, publish/unpublish, submit for approval and delete)
- Owners: Users assigned to this group will have the same permissions on documents as members but they will also be able to assign group memberships to these 3 groups)
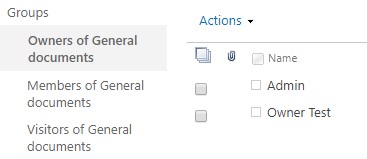
- A new browser tab will open where you can set/view permissions in SharePoint’s standard People and Groups page.
- To view which users/groups that are members of the group, just see who are listed under the name column:

- To add users or groups, click on the “New” menu:

A new window will open where you type in the users’ names or their e-mail addresses. Beneath the text-boxes click on the “SHOW OPTIONS” link and there un-check the “Send an email invitation” option, else users will get an e-mail invitation to SharePoint’s standard website:
- To remove users or groups, first mark the users/groups and then click on the “Actions” menu, where you select the “Remove Users from Group” option:

You will now need to confirm that you want to delete the users/groups.
- To set/view permissions on any of the other two permission groups, just click on the group names in the left navigation, under the “Groups” menu:

- To view which users/groups that are members of the group, just see who are listed under the name column:
Note
- Users that just have been granted permissions to a workspace will not directly see the workspace in the list of workspaces, on MetaShare’s start page, as the search engine first needs to index the new permissions, which usually takes about 15 minutes. The users will however directly be able to access the workspace, if they are given the direct link to the workspace.
- Permissions under any of the three permission groups can be assigned to individual users or to Active Directory groups. Select the option that makes most sense for your organisation. In general the recommendation is to use AD-groups for organizational belongings, e.g. members of the board and members of the management team, as these groups could be reused in other workspaces and applications. When a new person becomes a member of one of these groups, the person just needs to be added to the AD-group and automatically the user will get permission to all workspaces/applications where the group has permissions to. If the workspace is used for a project, whose members are not given permissions to any other resources than the specific workspace, it could be easier to assign permissions to the individual users.
- If you, as an administrator, have created a workspace and should not have access to the actual workspace, do not forget to also remove yourself from the Owners group, as the creator by default is added to this group.